Rainbow Pad Thai

IMG_2708.PNG

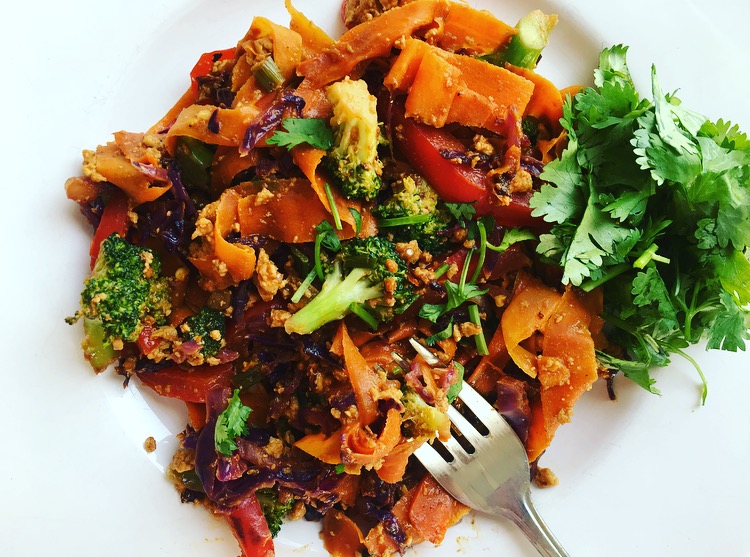
Aka noodle-free pad Thai, aka low carb pad Thai.

Minimalist Baker posted this recipe a few days ago and, despite raving about how amazing it is, I 100% expected to miss the noodles. NOPE! I was completely wrong, and this dish is everything right. It’s delicious and satisfying and full of amazing flavours. OMG, I can’t even.

Note: I seriously doubt that anyone could pull this together in <30 mins. The act of ribboning carrots is highly tedious and time consuming, and I did not enjoy it. However, that being said, I enjoyed eating this so much that I would definitely undertake carrot-ribboning again.

I only wish I had chopped peanuts.


5 stars.png      Worth ribboning carrots for

Makes 2-3 servings

TOFU

  • 1/2 c tofu, liquid pressed out & crumbled
  • 1 tbsp soy sauce
  • 1 tsp sriracha
  • 1/4 tsp turmeric (optional)

PAD THAI SAUCE

  • 1.5 tbsp peanut butter
  • 2 tbsp fresh lime juice
  • Scant 2 tbsp soy sauce
  • Scant 1 tbsp maple syrup
  • 1 tbsp ginger, minced (or to taste… I use lots)
  • red pepper flake, to taste
  • sriracha, to taste

VEGGIES

  • 1 tbsp sesame oil
  • 2 green onions, chopped
  • 4 cloves garlic, minced
  • 1 c thinly sliced red cabbage
  • 1/2 red bell pepper, cored and thinly sliced
  • 1 small head of broccoli, chopped into bite sized pieces
  • 2-ish tbsp soy sauce
  • 2 large carrots, peeled and ribboned with a vegetable peeler
  • Garnish: cilantro and chopped peanuts

Ribbon and chop all the veggies first. I find this takes forever, but it’s worth it to have everything ready to go.

Mix together all ingredients for tofu in a small bowl and set aside.

Mix all sauce ingredients together and set aside. Taste for flavour, add more maple syrup for sweetness, more soy sauce for saltiness, more sriracha for heat.

Heat a large cast iron skillet over medium-high. When hot, add sesame oil then broccoli, cabbage, peppers, green onions, garlic, and ~1 tbsp of soy sauce.  Sautee 3-5 minutes, stirring often.

Push the veggies off to one side and add tofu. Cook until it’s lightly browned (this should take a few minutes). Stir often.

Add carrot ribbons and more soy sauce, and sautee a few minutes more. Then add sauce and cook until everything is heated through.

Serve and enjoy and forget all about noodles.

Italian Macro Bowl

IMG_2535

The original name for this recipe is “Pizza Bowl”, which annoyed me. Mostly because I would say that this dish is more “pizza inspired” than it is reminiscent of an actual pizza. Which is totally fine… as long as you don’t go into it with the expectation that it will provide you with the same kind of satisfaction that you’d get from eating pizza. You won’t. This isn’t pizza.

That being said, this is still good. And it’s pretty nutritious, too, with the kale and brown rice. I wouldn’t go out of my way to make it again, but I did enjoy eating it when I was hungry.

Note to self: skip the olives next time. If there is a next time.

Adapted from Isa Does It.


2.5 stars      Not pizza

Makes 2 servings

PIZZA-STYLE SAUCE

  • 1/4 c raw cashews
  • 1 clove garlic
  • 1 1/2 tbsp tomato paste
  • 1/2 roasted red pepper
  • 1/4 c veg broth
  • 1/2 tbsp lemon juice
  • 1/8 tsp salt

MACRO BOWL

  • 1 tbsp olive oil
  • 4 cloves garlic, thinly sliced
  • 1/2 onion, thinly sliced
  • 1/8 tsp salt
  • 1 Italian vegan sausage (I like Field Roast and Gusta)
  • 1/2 bunch kale
  • Cooked brown rice
  • Fresh thyme leaves
  • Crushed red pepper flakes, to taste

For the sauce: add all ingredients to a blender and purée until completely smooth. Keep refrigerated until ready to serve.

For the macro bowl: preheat a large skillet over low heat. Add 1 tsp of oil and sautée garlic until lightly browned. Transfer to a plate.

Turn up heat to medium and sautee onion in another tsp of oil, with a pinch of salt. When translucent, add sausage and remaining oil. Cook until sausage is lightly browned and remove from pan.

Now, add kale and a pinch of salt. Cook with splashes of water until wilted.

To assemble, scoop rice into bowls and top with kale + sausages. Drizzle with a generous amount of sauce, then garnish with thyme and red pepper flakes.


Jamaican Curry with Sweet Potato & Black Eyed Peas

IMG_2079.JPG

Jamaican curry is totally a thing you should make. It’s simultaneously spicy, sweet, and savoury, and it’s the perfect thing to satiate tastebuds that are longing for some island time. Jah mon, it’s irie.

Out of necessity, I mostly invented this recipe. It seems that Jamaican curries are somewhat underrated (except by the bouncer who told me that it’s his favourite food), and I say this because I couldn’t find many vegan-friendly recipes out there in the vast expanse that is the internet. Also – whenever I tell someone I’m making Jamaican curry, they give me this weird look. Jamaican curry is delicious, people. Get wid it.

Unfortunately, I neglected to write down the recipe for the spice mix when I put it together a few months ago. I think I used some variation of this one, and I like it. I did try desperately to convince the aforementioned bouncer to discuss Jamaican spice combos with me, but he was more interested in having me leave the bar so that he could go home… which was disappointing… heartbreaking, almost… Cho! It was truly the Jamaican spice recipe that got away.


4.5 stars     this filling curry is good any day

Makes 3-4 servings

  • 1 tbsp coconut oil
  • 1/2 red onion, diced
  • 1/2 sweet potato, cut into bite-sized cubes
  • 3 hot chili peppers, minced (optional)
  • 5 cloves garlic, minced
  • salt + pepper, to taste
  • 2 tbsp Jamaican jerk spice
  • 1 1/2 tbsp tomato paste
  • 1 can coconut milk
  • 3 large kale leaves, chopped
  • handful of fresh oregano or cilantro, chopped
  • 1/2 cup frozen peas
  • 1/2 can black eyed peas
  • Rice, to serve

BUT FIRST, RICE. Unless you have pre-cooked rice, get started on that first. Rice takes forever to cook, and if you forget, the curry will be ready and you’ll be hungry and sad and annoyed. The food will smell so delicious that you’ll probably just eat it without the rice. But it’s better with.

Heat a large cast iron skillet over medium and add the coconut oil. When hot, add the sweet potatoes, onion, chilies, garlic, and salt + pepper. Sautee until the onions are soft. Add the Jamaican jerk, and cook a few minutes more to toast the spices.

Add tomato paste, coconut milk, kale, peas, and oregano or cilantro leaves. Bring to a low simmer and cook until the sweet potatoes are tender and the peas are warmed through. Last, add the black eyed peas.

Serve over rice, and with a side of fried plantains if you’re feeling indulge-y.

Kale Caesar with Chickpea Croutons

IMG_1809

Unlike many people, I actually don’t even like Caesar salad that much.

But, THIS. This Caesar is different. And I regularly find myself craving for it.

The dressing is tangy, creamy, and balanced with a little brininess from the capers. It’s rich without being too heavy. The crunchy kale holds its own, and the crispy chickpeas add enough protein to make this a meal. I also amped up the decadence with some cashew Parmesan. Because: f*ck yeah.

The dressing is adapted from Isa’s Classic Vegan Caesar recipe, the croutons are from Oh She Glows Crowd-Pleasing Vegan Caesar, and the parm is from Minimalist Baker’s Cashew Parmesan.


4 stars      A favourite go-to salad

Makes enough for 2 meal-sized servings of salad

CAESAR DRESSING

  • 1/4 c tahini
  • juice from 1/2 lemon
  • 1 clove garlic, crushed
  • 2 tbsp nutritional yeast
  • 2 tsp whole grain dijon mustard
  • 2 tsp capers, minced
  • 1/2 tsp lemon zest
  • 1/4 tsp salt
  • water, to taste

CHICKPEA CROUTONS

  • 1/2 can chickpeas, drained and rinsed
  • 1 tsp olive oil
  • sprinkle of garlic powder
  • sprinkle of onion powder

CASHEW PARM

  • 1/2 c raw cashews
  • 2 tbsp nutritional yeast
  • 1/2 tsp sea salt
  • 1/4 tsp garlic powder

SALAD

  • Kale: washed, stems removed, and torn into bite sized pieces
  • any other veg you might want – thinly sliced red onions? radishes? your call

Preheat oven to 400°F.

Prepare chickpeas: combine all ingredients in a bowl and mix to coat. Place on a baking sheet lined with parchment paper. Bake for 20 mins, then flip/roll the chickpeas to ensure even baking. Bake for another 10-20 mins. Let cool.

Dressing: combine all ingredient in a jar and mix. Add water to thin to your desired thickness. Set aside.

Cashew parm: combine all ingredients in a food processor. Pulse until a fine meal is formed. Store in the fridge to keep fresh.

Assemble the salad: mix kale/additional veg (if using) together with dressing. Top with chickpea croutons and parm. Devour!

Pesto Soup

IMG_1793

Does Pesto Soup sound weird to you?

If it does, it shouldn’t. Put your preconceptions behind you, and prepare to enjoy a creamy, flavourful, basil-y soup full of soft gnocchi pillows.

This recipe has been on my radar for a few weeks now, pretty much ever since I discovered its existence in the Isa Does It cookbook that I’ve had for YEARS. Side note: HOW did I manage to bypass a recipe that contains both gnocchi AND copious amounts of basil, 2 of my most favourite things?! This is somewhat distressing to me, but, moving on…

It’s taken a while for this dish to come to fruition, mostly due to some obstacles that I encountered grocery shopping. The recipe is fairly simple, but contains some ingredients that (apparently) aren’t super common in the PNW. Like navy beans. And swiss chard. These are totally normal things, and yet they are strangely absent from most grocery stores. In the end, I found everything I needed at good ol’ Superstore and the recipe came together quickly.

I’ve never actually eaten swiss chard and, in all honesty, it kinda freaked me out. I worried that it would be bitter and slimy, so I seriously considered subbing in kale. Instead, I sacrificed my comfort and gave it a test drive anyway. Rest assured, friends! My gastronomic gratification was not forsaken! and I am happy to report that swiss chard is totally cool and delicious. Kale would not have been as good.

Also, I actually followed this recipe *almost* exactly as it was written (aside from doubling the garlic, which was a standard choice). I didn’t want to risk making modifications given that I was already taking a chance with the swiss chard.  It turned out great, though, and I wouldn’t change anything. Plus, it’s low fat! (If you care about that kind of thing). In fact, this soup was so good that I burned my mouth in my hastiness to eat it. #worthit


4.5 stars     creamy and not too rich, perfect for rainy spring eves

Serves 5

  • 2 tsp olive oil
  • 6 cloves garlic, minced/crushed
  • ~ 1 lb cauliflower, cut into florets
  • 4 c veg broth
  • 1/2 tsp dried thyme
  • 1/2 tsp salt
  • pepper to taste
  • 1 tbsp arrowroot powder (or cornstarch)
  • 1 c packed fresh basil
  • ~ 8 oz frozen gnocchi, partially thawed
  • 1 small bunch swiss chard, stems discarded, torn into bite size pieces
  • 1 can navy beans

Take gnocchi out of the freezer.

Preheat a soup pot over medium, add oil + garlic and sautee. Add cauli, 3 cups of broth (YES ONLY 3), thyme, salt, and pepper. Cover and bring to a boil for ~10 mins. Cauli should be tender.

In a measuring cup, whisk remaining 1 cup of broth and arrowroot powder until dissolved. Lower heat, so soup is at a low boil, and mix it in. Cook uncovered for about 5 mins more. Add basil and remove from heat. Throw it all into the blender on high until completely smooth. Remember to let the heat escape, otherwise your blender lid will explode and you’ll have soup all over your kitchen.

Return soup to the pot and add gnocchi. Cook about 5 mins. Add greens and beans, and cook about 5 more mins. Be careful when stirring, so that you don’t crush the gnocchi. I taste tested my gnocchi to make sure that it was fully cooked before serving.

Serve with freshly ground pepper. I imagine that this would go really well with some artisan bread and olive oil. YUM.

Sundried Tomato Pasta

This recipe (from Oh She Glows Every Day) lured me in with its promise to be “on the table in under 30 minutes”. And also because I was looking for a new way to eat sundried tomatoes, besides turning them into delicious sunflower sausage.

A few lessons learned from this experience:

  • Good quality sundried tomatoes are a must
  • Basil should not be skipped
  • The ‘optional’ cherry tomatoes should also not be skipped
  • Read the recipe more closely (I unknowingly doubled the amount of sundried tomatoes and missed a number of ingredients… possibly because there is a second page to this recipe that I didn’t notice. Woops.)

UPDATE – March 2019 – I made this again recently and determined officially that this recipe issa no for me dawg. Sundried tomatoes have a strong, lingering taste that I juuuuust… EH. Pass.


2.5 stars     easy, tasty meal for a Monday

Serves 4

SUNDRIED TOMATO CREAM SAUCE

  • 1/2 c raw cashews, soaked
  • 1/2 c + 1 tbsp water
  • 4 cloves garlic
  • 1/3 c oil packed sundried tomatoes, drained (I used 2/3 c because I can’t read, apparently)
  • 2 tbsp fresh lemon juice
  • 1 tbsp nutritional yeast
  • 1/2 tsp salt
  • splash olive oil

PASTA

  • 450 g pasta of your choice (I used shells)
  • 1 package baby spinach
  • freshly ground pepper

In a food processor (or blender), combine all the cream sauce ingredients and blend until super smooth. Add olive oil if necessary to increase smoothness.

Bring a large pot of water to a boil & cook pasta according to package directions.

Put spinach into the colander in the sink. When pasta is done, empty the pot into the colander to drain (a quick way to wilt the spinach). Return pasta and spinach to pot and stir in the sundried tomato cream sauce.

Butternut Squash & Chickpea Buddha Bowl

image1 (1).PNG

This recipe was inspired by Minimalist Baker’s Sweet Potato Chickpea Buddha Bowl.

I made my version with butternut squash instead, because I’ve been craving for it lately. I also opted to add brown rice to make it more filling. And I made some other changes.

Overall, this dinner didn’t shine, but it was a satisfying weeknight supper that I would probably make again.


3 stars.png     satisfying and easy to prep
Serves 2

VEG

  • 2 tbsp olive oil
  • 1/2 butternut squash, cut into bite sized cubes
  • 2 handfuls kale,  stems removed (I used black kale)
  • salt + pepper

CHICKPEAS

  • 1/2 425 g can chickpeas
  • 3/4 tsp cumin
  • 1/2 tsp chili powder
  • 1/2 tsp garlic powder
  • salt + pepper

TAHINI SAUCE

  • 1/4 c tahini
  • scant 1 tbsp maple syrup (would use 1/2 tbsp next time, as I found it a bit too sweet)
  • juice of 1/2 lemon
  • 2 tsp nutritional yeast
  • 1 clove garlic, crushed
  • a few tbsp ice cold water to thin

Preheat oven 400°F (I baked at 450°F because I was sharing the oven).

Starting cooking rice, so that it’s done by the time everything else is ready. I used 1/2 c brown rice.

Put squash on a baking sheet covered in foil. Toss with oil, salt and pepper. Bake for 10 mins, then remove from oven and flip. Add kale, bake for another 4-5 mins.

While squash is roasting, heat a pan over medium. Toss chickpeas with seasonings. Once pan is hot, add oil & chickpeas and sautee, stirring frequently. Chickpeas should brown, and this takes about 10 mins.

Prepare sauce by adding tahini, maple syrup, lemon juice, nutritional yeast and garlic to a jar and stir. Add cold water until you have a pourable sauce.

To serve: top rice with squash, kale and chickpeas + top with sauce. I heated up the sauce, and I wouldn’t recommend that – the sauce tastes better cold.

Marinated Italian Baked Tofu + Sides

image1.JPG

Although this baked tofu was fine to eat for a Monday night dinner, it’s not something I would choose to repeat. Unlike many people, I actually like tofu. But it has to be well-prepared. And this dish is not that.

I was mostly inspired to make this because I felt I needed a side to go with my roasted pesto potatoes. Despite the fact that I have shamelessly admitted to eating chocolate and/or chips for dinner, it’s not something I purposefully try to do on a regular basis. So, it seemed appropriate that I should attempt to have a more well-rounded meal.

Enter marinated Italian baked tofu (loosely based on a recipe from Veganomicon). Oh, how *meh* you were.

It might be my fault for not following any of the suggested directions, including not measuring anything… but I really doubt it would have made a significant difference if I had.

The sides were way tastier – I made roasted potatoes, which I tossed with the pesto from a few days ago, cherry tomatoes, and spring mix. And mixed olives! Because I’m fancy sometimes.


2 stars     this sucked, but I’m sure not all baked tofu is like this

Oven 450°. Serves 1.

  • ~175 g tofu
  • ¼ c white wine
  • splash soy sauce
  • splash balsamic
  • splash olive oil
  • dried basil
  • dried marjoram
  • dried thyme
  • 1 clove garlic, crushed

Press tofu. There a pretty good guide for how to do that here. My tofu started frozen, and I didn’t have time to wait for it to defrost so I zapped it in the micro. Which seemed fine. Then I wrapped in paper towels and pressed it. Then slice into ¼” slabs.

Mix up the marinade in a bowl. You’re supposed to marinate the tofu for at least an hour, flipping once after 30 mins. I could only wait as long as it took the oven to preheat.

Bake on a sheet covered in foil for 15 mins. Then flip, douse with remaining marinade, and return to bake for 5 more mins.

Golden French Lentil Stew

image1(1).PNG

I found this recipe in Oh She Glows Everyday, and it seemed like the perfect thing to enjoy on a cool, rainy evening. I am totally a sucker for dishes containing cashew cream (*drool*), and also anything that can be paired with bread and butter.

Initially I got a bit bummed out because a box of French lentils at Donald’s (which usually has a good, reasonably priced selection of groceries) cost close to $11… which is a crazy price for LENTILS. And what is the point of making a FRENCH lentil stew, if you cannot obtain real French lentils? #annoyed.

However, the day was saved when I found these at Superstore for a fraction of the price (less than $5!):

image2.JPG

Apparently French lentils hold their shape better. I also found them more toothsome and pleasantly chewier than green lentils.

This recipe requires soaking the cashews for a few hours. Today, I actually planned ahead for once and had soaked cashews ready to go when I whipped up the soup. If you aren’t super organized like me (lol), I recommend the quick soak method: place cashews in boiling water and soak until needed.

For my nut-free friends, the cashews can be swapped out for sunflower seeds!

For me, this soup was really good, but it was missing something… it could be because it just isn’t the same as my most favourite Indian curry lentil soup.

…Or it could be because I forgot an ingredient (see notes below). I actually omitted 2, if you count the celery; but I don’t particularly like celery so I didn’t miss it. That being said, it probably wouldn’t hurt to add more thyme, or maybe some herbes de province to amp up the flavour.


3.5 stars     hearty and warms you up

Makes 5 servings

  • cashew cream: 3/4 c soaked cashews (original recipe calls for 1/2 c, but I had extra) + 1/2 c water
  • olive oil
  • 1 large onion, diced
  • 7 cloves garlic (would use 8 next time)
  • 1 tsp salt
  • 1 lrg carrot, diced
  • 3 tsp cumin
  • 1.5 tsp turmeric
  • 1.5 tsp thyme
  • 1 (398 mL) can diced tomatoes, with juices
  • 3/4 c French lentils
  • 5.5 c water
  • 4 tsp veg bouillon powder (2 cubes herb bouillon would be better)
  • 3 c stemmed and chopped kale (used lacinato and black kale)
  • freshly ground pepper
  • 1-2 tsp white wine vinegar (I completely forgot to add this)

Heat olive oil in a soup pot over medium. Sautee onion and garlic with salt until softened. Stir in carrots, and cook for a few more mins. Then add spices and stir.

Add tomatoes,  water, bouillon, and lentils. Bring to a boil over high. Then reduce heat to medium and simmer uncovered for 35 mins. Lentils should be tender.

While you wait, make cashew cream: add cashews and 1/2 c of water to a blender, blend on high speed for several mins. Should be super smooth.

Once lentils are done, stir in cashew cream and kale. Add salt, pepper, and vinegar (apparently?) to taste. Cook for a couple minutes until kale is wilted, then serve.

Stew will keep in an airtight container for up to 5 days in the fridge, or 2 months in the freezer (let cool completely before storing) – this makes it perfect for grab n’ go work lunches.

Pesto Gnocchi with Herb Crusted Tofu

Tonight’s dinner was partially inspired by a gnocchi dish that I tried (once upon a time) at Trattoria Italian Kitchen in Burnaby. I love the combination of the pillowy gnocchi with the salty, herby cream of the pesto and acidity of the tomatoes.

It was also inspired by the fact that I had a large bunch of basil in the fridge that was about to go bad. There was no way I was letting that go to waste… that sh*t is expensive.

Anyway this recipe turned out alright. It’s hard to tell exactly how successful it was, though, because I was STARVING by the time I ate, which always makes things taste better. As the cajun cook says – the secret to delicious cooking can be unlocked with two simple steps: (1) serve dinner late, and (2) serve your guests alcohol while they wait. That way, they are both ravenous and drunk by the time they eat.

Unfortunately, my hunger also prevented me from investing a minute into taking a picture of this meal. I devoured it immediately. I didn’t even pour a glass of wine to complement the food, as I had daydreamed about at work. Oh, well. I had the wine for dessert – problem solved.

The pesto recipe was modified from the pesto in Oh She Glows Everyday‘s Roasted Garlic Basil Pesto Potatoes with Arugula recipe. The herb crusted tofu was inspired by Isa Does It‘s Pesto-Cauliflower Pasta recipe. As usual, I debated for AGES about what combination of foods I should put together (gnocchi? shell pasta? spaghetti? roasted potatoes?). I was satisfied with the end result. But, as usual, there are a few things I would modify I would make if I made it again.

Pesto Gnocchi with Herb Crusted Tofu

Roasted Garlic Pesto

4 stars     simple and tasty – would make again

Makes about 1 c pesto

  • 3/4 c fresh basil leaves (recipe calls for 1 c, but this was all I had left)
  • ~1 c spinach leaves (because this is also green, and I had some I needed to use up)
  • 4 tbsp hemp hearts
  • 1/4 c olive oil
  • 2 tbsp fresh lemon juice (would adjust to 1 tbsp)
  • 2.5 tbsp nutritional yeast
  • a whole head of roasted garlic
  • salt
  • pepper

Make the roasted garlic: slice off the tops, drizzle in oil & wrap in tinfoil. Into the oven at 400 for 25-ish mins. Then for the pesto: put everything into a mini food processor and puree until smooth. Simple.

Herb Crusted Tofu

3 stars     somewhat fussy

  • 1/2 c breadcrumbs (I used panko, but see note*)
  • 1/2 tsp thyme
  • 1/2 tsp rosemary
  • 1/2 tsp basil
  • 1/2 tsp garlic salt
  • 175 g extra firm tofu, cut into 1/2″ cubes – DON’T overpress, it gets crumbly
  • generous splash of soy sauce
  • olive oil

Pre-heat cast iron pan over med-high with olive oil. Mix together breads crumbs and spices. In a separate bowl, mix the tofu and soy sauce. Cover the tofu cubes completely with bread crumbs, and throw them into the hot pan. Apparently, it should sizzle or you aren’t doing it right. Cook until browned on some sides, or as long as you can wait to eat.

*Note: In hindsight, brown bread crumbs would be better and I wouldn’t do panko again… unless it was the most convenient option, in which case I totally would.

Assemble

1/2 package gnocchi, cooked according to package (this was enough for my dinner + lunch the next day)
handful of diced cherry tomatoes
pesto
herb crusted tofu

Combine all ingredients in a bowl and stir so that everything is covered in pesto. Devour ASAP.

Next time, I would cook the pesto with a splash of non-dairy milk to get a creamier, saucier texture. And cook the tomatoes in the sauce to soften them a bit. I would also mix the gnocchi with sauce, and top with tofu (instead of mixing all together). And maybe eat it on a plate?